![]()
Bold Shelves, Bold Style: DIY Bookshelf Ideas That Speak Volumes

A bookshelf can be more than just a place to stack novels and magazines. It can reflect personality, spark creativity, and bring a fresh vibe to any room. Instead of settling for bland store-bought designs, explore clever, eye-catching ways to build your own shelves with materials that surprise and inspire. From repurposed ladders to floating cubes, each idea adds character while keeping things functional.
Wood crates become rustic charmers, while pipe-and-plank combos scream industrial cool. These DIY bookshelf ideas won’t just hold your favorite reads—they’ll become conversation starters and style statements.
Every design on this list invites hands-on action and delivers standout results without draining your budget. Whether the goal is to maximize a small space or make a bold design statement, the right shelf idea is waiting just a few screws away. Grab those tools, get creative, and let your walls do the talking.
DIY Bookshelf Ideas
Bookshelves do more than hold books. They add charm to any space. A handmade shelf brings personality to your home. It can also save money. These ten ideas will help you build a stylish and useful bookshelf.
1. Crate Bookshelf

Wooden crates are easy to find. You can buy them from craft stores or use old ones. Stack them in any shape. Glue or screw them together. Add paint or leave them natural. Crate shelves work well in bedrooms, living rooms, or even hallways.
Materials:
- Wooden crates
- Screws or wood glue
- Paint or wood stain (optional)
- Sandpaper
- Drill or screwdriver
Steps:
- Sand each crate to remove rough spots.
- Paint or stain if desired.
- Arrange crates in the shape you like.
- Attach crates with screws or glue.
- Let glue dry or tighten screws.
- Place books or decor.
2. Ladder Shelf
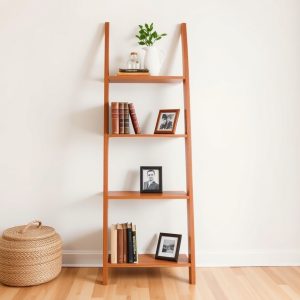
Old ladders make great bookshelves. Lean a wooden ladder against the wall. Place wooden planks across the steps. Secure the planks with screws if needed. The higher shelves can hold lighter items. Use the lower steps for heavy books or baskets.
Materials:
- Wooden ladder
- Wood planks
- Screws (optional)
- Paint or finish (optional)
Steps:
- Clean the ladder.
- Paint or stain if you want.
- Cut planks to fit across steps.
- Lay planks on steps.
- Secure with screws if needed.
- Add books or items.
3. Floating Wall Shelves
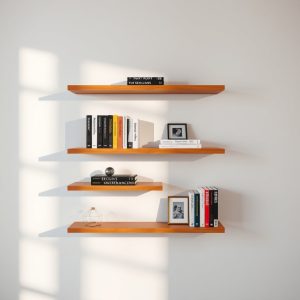
Wall shelves give a clean look. Use wooden planks and L-brackets. Mount the brackets on studs to hold weight. Choose the right wood thickness for strength. Paint or stain the shelves to match your decor. These are perfect for small spaces.
Materials:
- Wooden planks
- L-brackets
- Screws and wall anchors
- Paint or stain
- Drill and level
Steps:
- Mark spots on the wall using a level.
- Drill holes into wall studs.
- Screw L-brackets into wall.
- Place wood on brackets.
- Secure wood with screws.
- Add paint or stain.
4. Reclaimed Wood Shelf

Old wood has character. Use boards from barns, fences, or pallets. Cut them to the size you need. Sand them down but keep the aged look. Mount them with simple brackets or hang them with rope. Reclaimed wood fits rustic or modern homes.
Materials:
- Reclaimed wood boards
- Sandpaper
- Brackets or rope
- Screws
- Drill
Steps:
- Clean and sand the wood.
- Cut to the size you want.
- Attach brackets or ropes.
- Mount on wall studs.
- Place your books.
5. Pipe and Wood Shelf
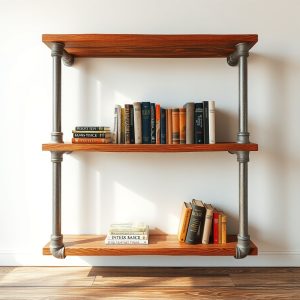
This style mixes wood and metal. Use black iron pipes for the frame. Attach them to the wall and floor. Add stained wood planks for shelves. This design is strong and industrial. It looks great in offices or living rooms.
Materials:
- Black iron pipes and fittings
- Wood planks
- Wood stain
- Screws
- Drill
Steps:
- Stain the wooden planks.
- Connect pipes into a frame.
- Secure frame to wall and floor.
- Place wood on pipe frames.
- Fix planks in place with screws.
6. Corner Bookshelf

Corners are often empty. Build a shelf that fits into that space. Cut wood to triangle shapes or buy ready-made corner units. Stack them upward to use vertical space. Corner shelves help keep small rooms tidy.
Materials:
- Plywood or wooden boards
- Screws
- Paint or stain
- Saw and drill
Steps:
- Cut wood into triangles.
- Sand and paint.
- Mark spots on corner walls.
- Drill in brackets.
- Place shelves on brackets.
7. Cubby Shelf

Cubbies help organize. Use plywood to build square boxes. Stack them in rows or columns. Glue and screw the pieces together. Paint them bright colors for kids’ rooms. Or keep them neutral for adult spaces. Add baskets for even more storage.
Materials:
- Plywood sheets
- Screws or wood glue
- Paint
- Saw and drill
Steps:
- Cut wood into equal squares.
- Assemble each cubby.
- Glue or screw them.
- Stack and secure together.
- Paint the shelf.
8. Tree-Shaped Shelf

Want a shelf that stands out? Build one that looks like a tree. Use a long vertical plank as the trunk. Attach smaller shelves as branches. Stagger the shelves for a natural look. Paint it green or keep it wooden. This is a fun idea for reading corners.
Materials:
- Wood planks
- Screws
- Paint or stain
- Drill and saw
Steps:
- Cut trunk and branch pieces.
- Sand and paint.
- Attach trunk to wall.
- Fix branches at angles.
- Use screws to hold firm.
9. Book Bench Shelf
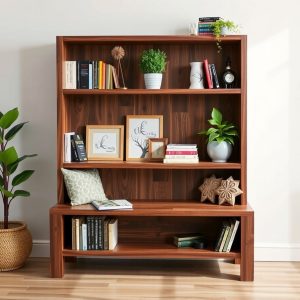
Combine seating with storage. Build a low bench with a shelf under it. Use strong wood and support beams. Add a cushion on top for comfort. Store books underneath in bins or open cubbies. This works well in entryways or bedrooms.
Materials:
- Plywood or hardwood boards
- Screws
- Drill and saw
- Cushion (optional)
Steps:
- Cut boards to bench size.
- Build a rectangle frame.
- Add bottom shelf support.
- Screw boards in place.
- Add cushion.
10. Hanging Rope Shelf
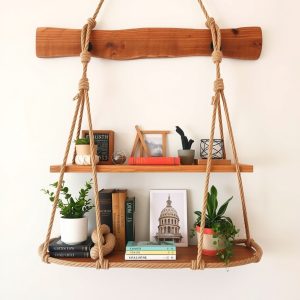
This design is simple and eye-catching. Use two ropes and wooden planks. Drill holes in the corners of the wood. Thread the rope through and tie knots under each shelf. Hang from wall hooks or a ceiling beam. It suits boho or coastal style rooms.
Materials:
- Wooden planks
- Thick rope
- Drill
- Hooks for wall or ceiling
Steps:
- Drill holes in wood corners.
- Thread rope through each shelf.
- Tie knots under each plank.
- Hang rope ends on hooks.
- Adjust height as needed.
FAQs
How do I choose the right bookshelf design?
Think about your space, your needs, and your style. Pick a design that fits all three.
Can I build a shelf without tools?
Some shelves like crate or rope shelves need little to no tools. Others might need saws and drills.
What wood is best for bookshelves?
Pine is cheap and easy to use. Oak and maple are stronger but cost more.
How do I make sure the shelf is strong enough?
Use solid brackets. Mount into wall studs. Avoid overloading shelves.
Can I use recycled materials?
Yes. Crates, pallets, and old furniture can all become bookshelves.
Conclusion
DIY bookshelves let you add storage and style your way. You don’t need to spend a lot. Simple tools and a bit of time can give you a unique piece for your home. Try one of these ideas and enjoy the shelf you built yourself.