![]()
Hands-on Magic: Unleash Your Creativity with These DIY Handicraft Ideas

Colorful threads, scraps of paper, a splash of paint—these ordinary items hold extraordinary potential. Crafting by hand sparks a unique sense of joy and achievement, bringing ideas to life in the most personal way. Handmade creations tell stories, preserve culture, and offer a fresh escape from the fast-paced digital world. Every stitch, fold, or brushstroke opens up a world of possibilities and invites expression without limits.
Simple tools and everyday materials can lead to inspiring results. Beads turn into boho-style jewelry, mason jars become rustic lanterns, and old t-shirts breathe new life as tote bags. Each project brings the satisfaction of turning something basic into something beautiful, functional, or both.
Time spent on handicrafts fuels imagination and calms the mind. Crafting can also connect people—family workshops, weekend projects with friends, or quiet solo moments of artistic exploration. Ideas don’t have to be complex or expensive to shine.
Grab your glue gun, thread those needles, and dive into a collection of creative DIY handicraft ideas that promise fun, flair, and a touch of homemade charm.
10 DIY Handicraft Ideas
Handicrafts bring joy, help reduce stress, and make great gifts. With just a few materials, you can create amazing things right at home. Here are 10 easy and fun DIY handicraft ideas. Each one includes the materials you need and step-by-step instructions. Let’s begin.
1. Paper Flowers
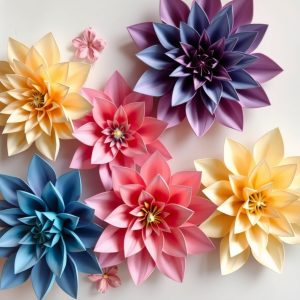
Materials: Colored craft paper, scissors, glue, pencil, ruler.
Steps:
- Cut paper into squares (about 4×4 inches).
- Fold a square diagonally to make a triangle.
- Fold the triangle in half again.
- Draw a petal shape starting from the folded edge.
- Cut out the shape and unfold it to get a flower.
- Stack 2-3 different sized flowers and glue them in the center.
- Add a small circle or button in the center to finish.
Paper flowers look lovely in vases or on greeting cards.
2. Beaded Bracelets
Materials: Elastic string, colorful beads, scissors.
Steps:
- Cut a piece of elastic string long enough to wrap around your wrist.
- Thread the beads onto the string. Mix colors and shapes.
- After adding beads, tie the ends of the string in a tight knot.
- Pull the knot inside a bead to hide it.
Wear it or gift it to a friend. These bracelets are quick and beautiful.
3. Painted Glass Jars
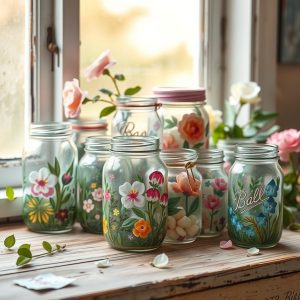
Materials: Glass jars, acrylic paint, brushes, tape (optional).
Steps:
- Clean the jar and remove any labels.
- Use tape to create patterns or sections.
- Paint the jar with your chosen colors.
- Let it dry fully.
- Remove tape for a clean look.
Use painted jars to hold pens, brushes, or flowers.
4. Button Art
Materials: Buttons of various sizes, glue, canvas or thick paper.
Steps:
- Sketch a simple shape like a heart, tree, or balloon on the canvas.
- Arrange buttons over the sketch.
- Glue each button in place.
- Let it dry and hang it on a wall.
Button art adds a pop of color to any room.
5. Sock Puppets
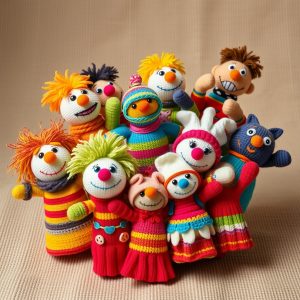
Materials: Old socks, glue, googly eyes, yarn, felt, scissors.
Steps:
- Place your hand inside the sock to shape the mouth.
- Use glue to add eyes, nose, and mouth.
- Cut yarn for hair and glue it on top.
- Decorate with felt shapes like hats or ears.
Puppets make storytelling fun for kids.
6. Mason Jar Candle Holders
Materials: Mason jars, glue, tissue paper, tealight candles, brush.
Steps:
- Tear tissue paper into small pieces.
- Apply glue to the jar with a brush.
- Stick tissue paper on the jar to cover it.
- Let it dry.
- Place a candle inside.
These candle holders glow softly and look handmade.
7. Clothespin Photo Holders
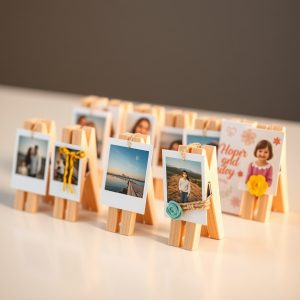
Materials: Clothespins, paint, string, small nails, hammer.
Steps:
- Paint clothespins in your favorite colors.
- Nail two small nails on a wall or board.
- Tie the string between the nails.
- Clip photos onto the string using painted clothespins.
These holders display memories in a simple way.
8. Pebble Art
Materials: Small flat stones, glue, canvas, marker.
Steps:
- Arrange stones into a shape or scene like a family, tree, or animal.
- Glue each stone in place.
- Use a marker to draw extra parts like branches or faces.
Pebble art brings nature into your home.
9. DIY Dreamcatcher
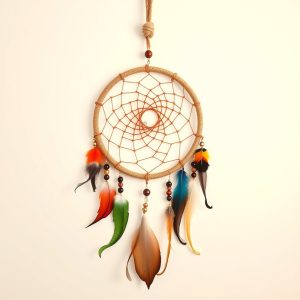
Materials: Embroidery hoop, yarn, lace, beads, feathers, glue.
Steps:
- Wrap yarn around the hoop tightly.
- Create a web inside the hoop using yarn.
- Add beads in the web.
- Tie lace, feathers, and strings to the bottom.
Hang the dreamcatcher near your bed for decoration.
10. Seashell Magnets
Materials: Small seashells, magnets, glue, paint (optional).
Steps:
- Clean the seashells.
- Paint them or leave them natural.
- Glue a small magnet on the back of each shell.
- Let them dry.
Use them on your fridge for a beachy look.
FAQs
Q: Can kids try these handicrafts?
Yes, most of these are safe for kids. Just make sure they have adult help with scissors or hot glue.
Q: Where can I get the materials?
You can find them at craft stores, online, or even at home. Reuse things like jars, old socks, and buttons.
Q: How long do these crafts take?
Most take 30 minutes to 1 hour. Some, like pebble art or dreamcatchers, may take longer if you add lots of details.
Q: Can I sell these handmade items?
Yes. Many people sell them at fairs or online. Just add your own style.
Final Thoughts
DIY handicrafts are easy, fun, and creative. These 10 ideas help you start crafting right away. You don’t need fancy tools. Just basic supplies and your imagination. Try them one by one. Decorate your space or share your creations with others. Making things by hand feels great. So grab some materials and begin today.