![]()
Make a Statement at the Curb: Fresh DIY Mailbox Ideas You’ll Want to Try

A mailbox isn’t just a place for bills and postcards—it’s a chance to express creativity and set the tone for your home before guests even step through the door. A standard, store-bought box might do the job, but it won’t turn heads or spark conversation.
That’s where a unique, homemade mailbox steps in to change the game. Bold designs, unexpected materials, and clever repurposing of everyday items can turn this small structure into a standout feature. From rustic farmhouse vibes to modern, sleek styles, there’s a project that fits every skill level and aesthetic.
Even small upgrades like custom paint or quirky post toppers can bring personality to your curbside. This collection of DIY mailbox ideas proves that curb appeal doesn’t stop at landscaping or paint color. Grab your tools, find your inspiration, and give your front yard a fresh focal point that delivers more than just mail.
DIY Mailbox Ideas
A mailbox doesn’t have to be boring. With a little creativity, anyone can make a unique one. From rustic wooden boxes to bright and bold colors, these ideas help your mailbox stand out. Below are ten detailed DIY mailbox projects to try.
1. Wooden Farmhouse Mailbox

Wood brings a warm and natural look. To make a farmhouse-style mailbox, use reclaimed wood or cedar. Build a simple box with a sloped top. Sand it smooth, then stain or paint it white or brown.
Use black hinges and a small handle for the door. Add a painted number on the side. You can mount it on a wooden post or attach it to a wall.
This design fits well in rural areas or homes with rustic décor.
Materials:
-
Cedar or pine wood boards
-
Wood screws
-
Outdoor wood glue
-
Sandpaper
-
Wood stain or paint
-
Black hinges and latch
-
Post or mounting bracket
Steps:
-
Cut the boards into panels for the box: bottom, top (angled), sides, back, and front with a door.
-
Use screws and wood glue to put the box together.
-
Attach the front door with hinges and a small latch.
-
Sand the whole box until smooth.
-
Stain or paint the wood.
-
Mount it on a wooden post or wall bracket.
-
Add your house number with paint or stickers.
2. Vintage Metal Mailbox

Old-school metal styles never go out of fashion. Start by finding an old metal mailbox at a flea market or hardware store. Spray paint it with matte black or deep green.
Add vintage stickers or hand-painted designs. Use metal stencils for your address numbers. To complete the look, place it on a cast-iron stand or wooden base.
This type brings a classic feel to your front yard.
Materials:
-
Old metal mailbox
-
Sandpaper
-
Rust-resistant spray paint
-
Vintage decals or stencils
-
Clear protective spray
-
Mounting hardware
Steps:
-
Sand off rust or old paint from the metal.
-
Spray paint the mailbox in black, green, or navy. Let it dry.
-
Apply decals or use stencils to add vintage patterns.
-
Spray a clear coat to protect the finish.
-
Mount it on a metal or wood stand near the curb.
3. Brick Mailbox with Planter

Add both charm and function. Use bricks or stone to build a square mailbox pillar. Inside the pillar, leave a space for the mailbox box. On top, add a flat space or built-in planter.
Grow small flowers or succulents in the planter area. Use mortar to fix everything in place. Seal the bricks for long-lasting results.
It looks professional but still has a homemade touch.
Materials:
-
Red or stone bricks
-
Mortar mix
-
Level and trowel
-
Metal or plastic mailbox
-
Small plants or flowers
-
Waterproof sealant
Steps:
-
Mark a square base on the ground.
-
Mix mortar and lay bricks in layers. Leave a space in the front for the mailbox.
-
Keep building until your desired height.
-
Insert the mailbox inside the brick frame.
-
Add a brick border on top for the planter area.
-
Let everything dry and seal it.
-
Fill the top space with soil and plants.
4. Painted Mailbox Art
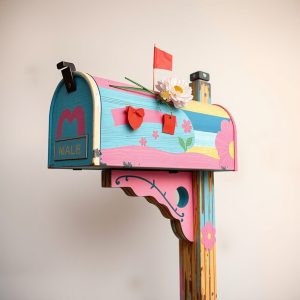
Paint brings life to anything. Use a plain steel or plastic mailbox. Clean it well and apply a primer. Then choose a simple theme. Flowers, birds, clouds, or geometric shapes work well.
Use outdoor acrylic paints and clear coat it with a sealant. This keeps the colors bright and weather-safe.
This idea is great for families. Let kids join in and add their art.
Materials:
-
Plain metal or plastic mailbox
-
Outdoor primer
-
Acrylic paint
-
Paintbrushes or sponge
-
Clear sealant spray
Steps:
-
Clean the mailbox and apply primer.
-
Sketch your design using a pencil.
-
Paint your design using brushes. Simple ideas: sunflowers, clouds, birds.
-
Let the paint dry completely.
-
Spray with sealant to protect from weather.
-
Reattach the mailbox or mount it on a post.
5. Mailbox on a Fence

Not every mailbox needs a post. You can attach it to a front fence. Use a sturdy wall-mounted mailbox. Pick one with a lid to keep water out.
Paint the mailbox in a bold color like red or blue. Match the paint to your fence or house trim.
Add a small hook under the box for holding newspapers or notes. It saves space and looks neat.
Materials:
-
Wall-mounted mailbox
-
Screws and drill
-
Paint
-
Hook for newspaper (optional)
Steps:
-
Choose a flat area on your fence near the entrance.
-
Paint the mailbox in a bright or matching color.
-
Drill holes and screw the box to the fence.
-
Add your house number or name.
-
Install a small hook below for newspapers or flyers.
6. Modern Steel and Wood Combo

Mixing metal and wood creates a sleek look. Use a stainless steel box and attach wooden slats around it. Choose teak or treated pine for durability.
Mount it on a dark wooden post or metal frame. Use clean lines and no extra decoration. Add only the house number in bold black.
This design suits modern homes or minimalist styles.
Materials:
-
Stainless steel mailbox
-
Wooden slats (treated pine or teak)
-
Screws
-
Drill
-
Black or gray paint
-
Metal or wood post
Steps:
-
Cut the wooden slats to size.
-
Wrap them around the steel box’s sides and back, leaving the front open.
-
Screw the slats into place.
-
Mount the box on a painted post.
-
Add your house number in clean black font.
7. Mailbox with Chalkboard Front

Write notes right on the box. Start with a wooden or metal box. Paint the front with chalkboard paint. Let it dry and add a second layer.
Mount it on a post or wall. Use white or colored chalk to write your name, messages, or doodles.
It’s fun and also functional. You can leave reminders or notes for the mail carrier.
Materials:
-
Wood or metal mailbox
-
Chalkboard paint
-
Sandpaper
-
Paintbrush
-
Chalk or chalk marker
Steps:
-
Clean and sand the front of the mailbox.
-
Apply two coats of chalkboard paint. Let it dry fully.
-
Reinstall the mailbox.
-
Write messages, reminders, or names on the chalkboard.
8. Upcycled Container Mailbox

Turn old items into a creative mailbox. Use an old milk can, toolbox, or even a bread box. Clean it up and repaint it. Cut an opening with a lid on top.
Make sure it’s safe and weatherproof. Mount it on a wooden base or use brackets to fix it in place.
This one-of-a-kind idea brings personality and helps the environment too.
Materials:
-
Old metal container (milk can, toolbox, bread box)
-
Spray paint
-
Metal saw (if cutting needed)
-
Hinges and latch
-
Screws
-
Wooden base or mounting pole
Steps:
-
Clean the container and cut an opening for mail, if needed.
-
Attach a hinged lid with a latch.
-
Spray paint the entire container.
-
Mount it securely on a base or post.
-
Add decorations or numbers to personalize it.
9. Coastal-Style Mailbox

Give your mailbox a beach vibe. Use colors like light blue, sandy beige, or white. Decorate with small seashells, starfish, or rope.
Choose a wooden box and lightly sand it to look aged. Use water-resistant paint and glue for outdoor use.
Place it on a driftwood post or white-painted stand. It brings calm and fresh energy to your yard.
Materials:
-
Wood mailbox
-
White, beige, or blue paint
-
Small rope
-
Seashells or starfish
-
Waterproof glue
-
Driftwood or white post
Steps:
-
Paint the mailbox in soft beach colors.
-
Glue rope around the edges or base.
-
Attach shells and decorative items with waterproof glue.
-
Mount it on driftwood or a white wooden post.
-
Add your address on the side or top.
10. Hidden Mailbox in a Garden Post

Blend function with your landscaping. Build a short wooden pillar with a door that opens forward. Hide the mailbox inside. Cover the top with a flowerpot or birdhouse.
Paint the post to match your garden. Add your house number on the door. This makes your mailbox part of the scenery.
It’s useful and almost invisible from the street.
Materials:
-
Wood planks
-
Saw and drill
-
Screws
-
Small door with hinge
-
Mailbox insert or box
-
Paint
-
Flower pot or birdhouse
Steps:
-
Build a box-style wooden post with enough room to hold a mailbox.
-
Cut a door on the front and attach with a hinge.
-
Slide the mailbox insert inside.
-
Paint the structure to match your garden colors.
-
Add a flower pot or small birdhouse on top.
-
Place it at the edge of your garden path.
FAQs
How can I waterproof a DIY mailbox?
Use outdoor paints, sealants, and rust-resistant hardware. Keep the lid tight to block rain.
Do I need a flag on my mailbox?
Yes, if it’s a curbside box in many countries. The flag shows when there is outgoing mail.
Can I use any container for a mailbox?
Yes, as long as it’s strong, weather-safe, and meets postal rules. Check your local guidelines.
Should I paint the inside of the mailbox too?
It’s not required, but painting it can prevent rust or wood rot.
What’s the best height for a mailbox?
Most postal services suggest around 41 to 45 inches from the ground.
Conclusion
A DIY mailbox adds charm and a personal touch to your home. These ten ideas are easy to make and fit different tastes. From classic wooden designs to bold painted boxes, the choices are endless. Try one of these and make your home’s first impression stand out.
Would you like a printable guide or checklist for building one of these?