![]()
Creative DIY Privacy Fence Ideas That Wow

Privacy doesn’t have to come at the cost of style. A well-built fence can do more than block unwanted views—it can shape the entire feel of your outdoor space. With a few tools, smart planning, and a touch of creativity, any homeowner can build a fence that reflects personality while enhancing privacy.
Wood slats, metal panels, lattice screens, or upcycled doors—options for DIY fencing stretch far beyond the basic picket. A splash of paint or clever pattern can turn a plain divider into a backyard statement piece. Bamboo rolls offer a natural look, while corrugated metal adds a modern edge. Reclaimed materials tell a story and save money at the same time.
Some ideas focus on clean lines and simplicity, others on texture and bold contrast. Every yard presents an opportunity to get hands-on and bring unique fencing visions to life. Privacy doesn’t mean retreating from style—it means designing your space on your terms. The right fence brings both function and flair, setting the scene for backyard gatherings, quiet mornings, or carefree afternoons.
Table of Contents
ToggleDIY Privacy Fence Ideas
A fence can add beauty, safety, and privacy to any backyard. Building your own fence might sound hard, but many styles are easy and affordable. You can make your fence look great and still keep your space private. Here are 10 smart DIY privacy fence ideas. Each comes with simple materials and easy steps. Let’s get started.
1. Classic Wooden Fence

Materials: Wooden planks, fence posts, nails or screws, cement, wood stain or paint
Steps:
- Mark the fence line using string.
- Dig holes for posts about 6-8 feet apart.
- Set posts in concrete and let them dry.
- Attach horizontal support rails.
- Nail or screw planks vertically to the rails.
- Apply paint or stain for weather protection.
Wooden fences are strong and last for years. They give a traditional look that fits any yard. Paint them for color or stain to keep a natural feel.
2. Bamboo Fence
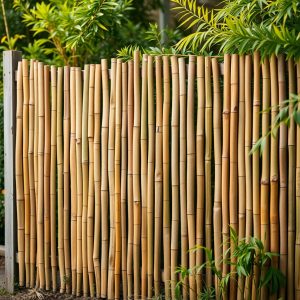
Materials: Bamboo poles or rolls, wooden frame, zip ties or screws, garden wire
Steps:
- Build a simple wooden frame.
- Attach bamboo rolls or poles using wire or zip ties.
- Secure the frame between fence posts.
Bamboo looks stylish and natural. It blends well with plants and adds a tropical touch. It also blocks views and wind.
3. Pallet Fence

Materials: Wooden pallets, screws, nails, saw, posts (optional)
Steps:
- Gather same-size wooden pallets.
- Remove broken pieces.
- Stand pallets side by side.
- Screw or nail them together.
- For more support, attach them to posts.
Pallet fences are low-cost and eco-friendly. Many places give away old pallets for free. Paint them to match your garden or leave them rustic.
4. Lattice Fence With Climbing Plants

Materials: Wooden posts, lattice panels, nails, climbing plants like ivy or jasmine
Steps:
- Set posts in the ground with concrete.
- Attach lattice panels to posts.
- Plant climbing vines at the base.
- Guide the plants to grow up the lattice.
This fence is both pretty and private. The plants fill the gaps in the lattice over time. It brings greenery and shade to your yard.
5. Corrugated Metal Fence

Materials: Corrugated metal sheets, wooden or metal frame, screws, posts
Steps:
- Build a frame with wooden or metal posts.
- Attach horizontal rails.
- Screw in metal sheets.
- Seal edges to keep out moisture.
Metal fences last a long time and block wind well. They give a modern and industrial look. You can mix metal with wood for a cool design.
6. Horizontal Slat Fence

Materials: Wooden slats, fence posts, screws, level, stain
Steps:
- Set posts in the ground.
- Space slats evenly and screw them to the posts.
- Use a level to keep slats straight.
- Stain the wood for a clean look.
Horizontal slats look fresh and modern. You can control the gap between slats. Tight gaps mean more privacy.
7. Recycled Shutter Fence
Materials: Old w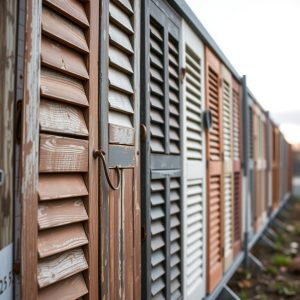 indow shutters, nails or screws, posts or frames
Steps:
- Collect old shutters in similar sizes.
- Build a frame or set up posts.
- Screw shutters into place.
- Paint or decorate if needed.
This is a fun and creative way to reuse items. Each section can look different. Great for cottage or farmhouse style yards.
8. Living Privacy Wall

Materials: Wooden pallets or shelves, potted plants, soil, plants like ferns or herbs
Steps:
- Set up pallets or shelves to stand tall.
- Place potted plants or fill boxes with soil.
- Arrange plants in layers.
This fence is alive. It looks beautiful and also cleans the air. Good for patios or small spaces.
9. PVC Privacy Fence

Materials: PVC panels, posts, cement, screws
Steps:
- Mark your fence area.
- Set PVC posts in concrete.
- Attach panels between posts.
PVC fences are clean, strong, and need little care. They resist weather and come in many styles. White is the most common, but other colors are available.
10. Wattle Fence

Materials: Thin branches (willow, hazel), thick wooden posts, garden clippers
Steps:
- Set wooden posts in the ground.
- Weave thin branches in and out between posts.
- Trim edges for a neat look.
Wattle fences are old-style but charming. They work well in gardens or small farms. Use fresh branches so they bend easily.
FAQs
Q: What is the cheapest type of privacy fence?
Pallet fences or wattle fences cost the least. You can often find pallets or branches for free.
Q: How tall should a privacy fence be?
Most privacy fences are 6 feet tall. Some local rules may limit height.
Q: Can I build a fence without digging?
Yes, use above-ground planters or heavy blocks to support the frame. But this works best for short fences.
Q: How long does it take to build a fence?
One weekend is enough for most DIY fences. Some, like plant fences, need time to grow.
Q: Do I need permission to build a fence?
Check with your city or neighborhood group. Rules vary by location.
Conclusion
Privacy fences do more than block views. They make your space feel safe and cozy. With simple tools and low-cost materials, you can build a fence that fits your style. Pick one idea from the list and make it your weekend project. Your yard will feel more private and peaceful in no time.